Help and getting started
Start with one field.
Draw the boundary, then cut at least one parcel out of it. Everything you write down afterwards attaches to a parcel, so the two belong in the same sitting. The areas, the costs and the reports all follow from there.
iPhone. Works with no signal. Six tasks in the order you would actually do them, then the limits and the questions.
English
01
Boundary and parcels
Every field needs at least one parcel.
The field is the outline. The parcel is the piece you actually farm, and it is what a crop, a treatment, a cost and a harvest attach to. A field on its own has nowhere to hold any of them, so draw both before you go any further.
- 01 Open the Fields tab. It is satellite imagery, so the tree line and the ditch sit where you expect them.
- 02 Start a new field and trace the boundary, following the edge you can see under your finger.
- 03 Close the shape. The area comes back in hectares or acres. Name it what you already call it. Creek Bottom, Home 80, the one behind the shed.
- 04 Open the field you just saved and tap Add Parcel. Trace the parcel just inside the boundary, name it, give it its crop.
- 05 If the whole field is one crop, that single parcel is all you need. Stop here and go and log something against it.
- 06 If it carries more than one, tap Split Parcel to cut the field in two, or add the rest by hand. Two parcels is normal, eight is fine.
A parcel has to sit inside its field, and it cannot overlap the parcel next to it. If the app will not close the shape, that is usually why. Redraw it a little tighter.
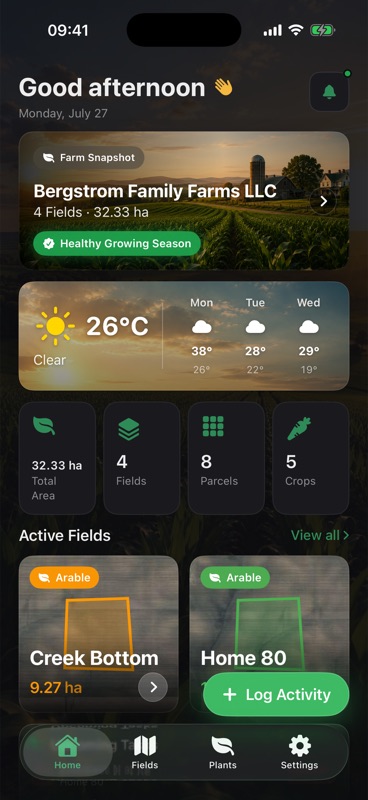
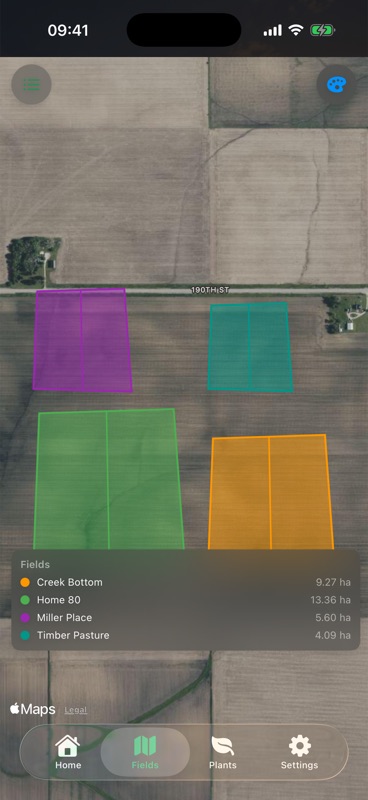
Four fields cut into eight parcels, and the counters that come off them. The screenshots on this page use a demo farm. Your own copy opens on an empty map with every counter at zero.
02
Reminders
Put the next job on a date.
A reminder is a note with a day attached to it. When the day comes it arrives as a notification, whether or not the app is open.
- 01 Write the reminder and give it a date.
- 02 Say yes when iOS asks whether Agrondo may send notifications, or nothing will reach you.
- 03 If you already said no, open iOS Settings, find Agrondo in the list and allow notifications there.
Read the forecast before you pick the day
The forecast for the location you mapped sits on the home screen, under the farm snapshot. Look at it first and a spray date becomes a decision rather than a guess.
- Weather
- Forecast for the mapped location
- Reminders
- Arrive as notifications
03
Journal
Log it against the parcel it happened on.
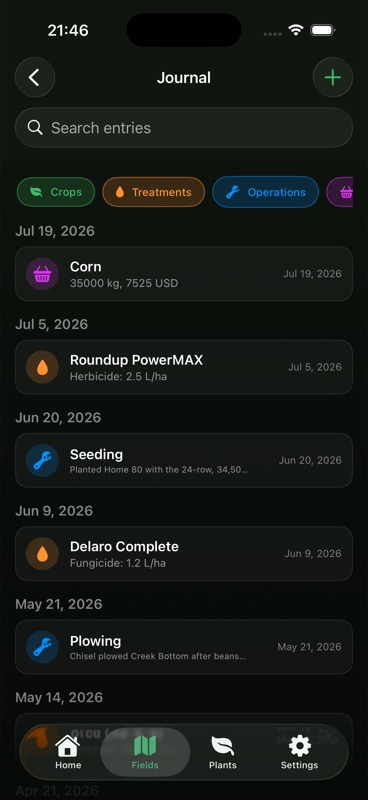
One parcel’s journal on the demo farm. Every line carries its dose, its weight or its date.
- 01 Draw a parcel first if you have not. A field with none reads No parcels in this field, and the entry has nothing to attach to.
- 02 Tap Log Activity on the home screen. It asks for the field, then the parcel, then the kind of entry, and skips a step when there is only one thing to pick.
- 03 Or go the other way round: open the parcel, tap Journal, then the plus button in the top right corner.
- 04 Pick the kind. A crop sown, a treatment, a field operation, a harvest, a photo. A treatment takes the product and the dose. A harvest takes the weight and what it made.
- 05 Set the date and save. It writes to the phone, so no signal is not a reason to leave it until you get home.
Finding one entry again in November
The chips along the top of the journal narrow it to crops, treatments, operations, harvests or photos, and a search box sits under them. That is how you get back to one spray out of a whole season.
04
Cost and revenue
Every entry lands in a report.
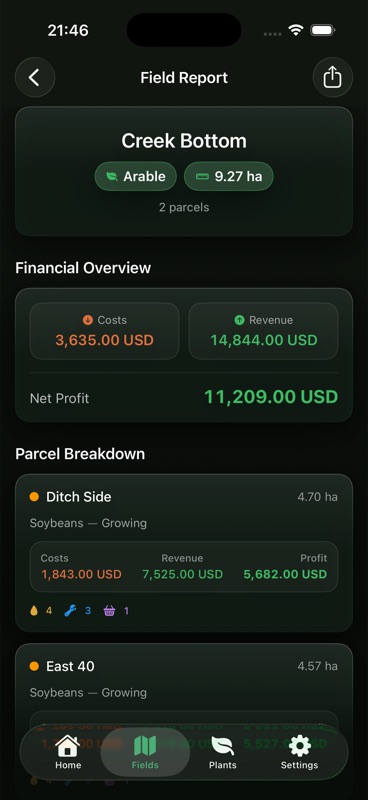
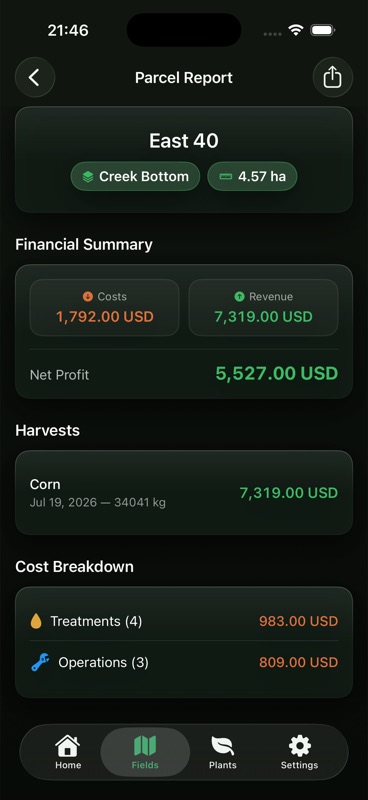
- 01 Open a parcel and tap Report. The financial summary sits at the top.
- 02 Under it: the harvests that made the revenue, and the cost breakdown that spent it.
- 03 Step up to the field report to see every parcel beside the others, with the field’s own totals.
- Costs
- Treatments and operations
- Revenue
- What the harvests brought in
- Net profit
- Revenue less costs
- Levels
- Parcel and field
Nothing on either screen is typed twice, and the figures here are demo records. If a number looks wrong, the entry behind it is wrong, and the journal is where you go to fix it.
05
Identification and care
Get close, then tap Identify.
- 01 Open the Plants tab and tap Identify a plant.
- 02 One leaf or one flower filling the frame reads better than a whole plant at ten paces.
- 03 Open the care guide on the result for the soil, the temperature, the season, the light and the water it wants.
3 a month on the free tier
This is one of the two things in the app that need a connection. The photo goes out to PlantNet and the answer comes back. The privacy page lists exactly what is sent, and what is not.
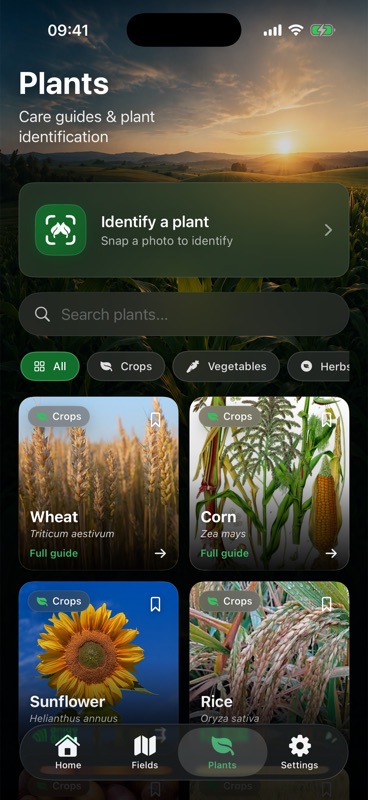
The Identify button sits above the care library, which you can search and read without taking a photograph at all.
06
What comes out
Reports- One report, parcel or field
- CSV
- Every field, from Settings
- Built
- On the device
- Signal
- Not required
- Tier
- Subscription
The file is made on the phone. Once you have shared it, it lives wherever you sent it.
Export
Get it off the phone as a file.
Two exports, kept in two different places. Both need a subscription.
- 01 For the PDF, open the report you want, at parcel level or field level.
- 02 Tap Export PDF in the top right corner. It carries the usual share icon.
- 03 For the CSV, go to Settings and tap Export Data. It covers every field you have, not just the report you were reading.
- 04 Either way the iOS share sheet takes over: mail, messages, or straight into Files.
07
Limits
Where the free tier stops.
Two fields, and three plant identifications a month. There is no account to make and nothing to sign. Boundaries, parcels, the journal, the rotation warning, the forecast and reading every report on screen all sit inside that.
Taking a file away does not. The PDF and the CSV both want a subscription, billed weekly or monthly, and the same subscription takes the ceiling off the fields and the identifications.
Prices are set in the App Store, in your own currency. None is printed here.
Free
No account needed- Fields
- 2
- Plant identifications
- 3 a month
- Mapping and areas
- Included
- Journal
- Included
- Reports on screen
- Included
- PDF and CSV export
- Subscription
08
Questions
Before you ask.
Nobody has used Agrondo yet, so these are the questions I expect rather than a record of any. If yours is not here, write to me from the support page.
Do I have to split a field into parcels?
You need at least one. A crop, a treatment, an operation and a harvest all attach to a parcel, never to the field, so a field on its own has nowhere to hold them. If the whole field is one crop, draw a single parcel just inside the boundary and leave it at that. The field report adds up whatever parcels it finds.
Do I need a signal out in the field?
Not for the work. Drawing a boundary, writing a journal entry, reading a report and exporting one all run on the phone. Two things do need a connection: plant identification, because the photo travels to PlantNet, and the weather forecast.
Where do my records live?
On the device. There is no server holding your yields and no copy of them reaches me. Use your usual iPhone backup if you want them kept, and note that deleting the app deletes them. The privacy page goes through this in full.
Do I have to make an account?
No. There is nothing to sign up for and no password to lose. Open the app and draw a field.
Hectares or acres?
Either. Areas read in hectares or in acres, and the reports follow whichever one you work in.
Will it tell me if I put the same crop back?
Yes. If the same crop returns to a parcel in consecutive years, Agrondo says so while you are still planning, not after the drill has been through.
What language will it be in?
Agrondo ships in 16 languages.
Can I download it yet?
Not yet. Agrondo is close to finished and is not in the App Store. Write to me and I will tell you the day it lands, once, and then leave you alone.
Still stuck
Tell me what you were trying to do.
Say which screen you were on and what happened instead. That is usually enough for me to work out the rest.